Developer Guide
Setting Up and Getting Started
:heavy_exclamation_mark: Caution Follow the steps in the following guide precisely. Things will not work out if you deviate in some steps.
First, fork this repo, and clone the fork into your computer. If you plan to use Intellij IDEA (highly recommended):
- Configure the JDK:
- Ensure you have the correct JDK version installed in your computer.
- Open IntelliJ (if you are not in the welcome screen, click
File → Close Projectto close the existing project dialog first). - Set up the correct JDK version for Gradle.
- Click
Configure → Project Defaults → Project Structure - Click
New…and set it to the directory of the JDK.
- Import the project as a Gradle project:
- IntelliJ IDEA by default has the Gradle plugin installed. If you have disabled it, go to
File → Settings → Pluginsto re-enable them. - If your project involves GUI programming, similarly ensure the JavaFX plugin has not been disabled.
- Click
Import Project(or Open or Import in newer version of Intellij). - Locate the
build.gradlefile (not the root folder as you would do in a normal importing) and select it. Click OK. - If asked, choose to Open as Project (not Open as File).
- Click OK to accept the default settings but do ensure that the selected version of Gradle JVM matches the JDK being used for the project.
- Wait for the importing process to finish (could take a few minutes).
- :heavy_exclamation_mark: Note: Importing a Gradle project is slightly different from importing a normal Java project.
- IntelliJ IDEA by default has the Gradle plugin installed. If you have disabled it, go to
- Verify the setup:
- Run the
java -jar DukeProject.jarand try a few commands.
- Run the
Design
Architecture
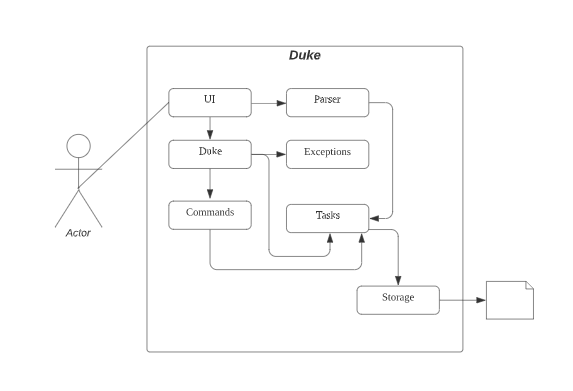
The Architecture Diagram shown gives an overview of the high-level design.
Main has 2 classes named Main and MainApp . It would perform the following functions:
- At launch: Initialize the components in the correct sequence, and connect them up with each other.
- At shut down / Exit: Shuts down the components and invokes save / cleanup methods where necessary.
The application then consists of four other components:
UI: The UI of Duke.Duke: The class that contain all the logics.Model: Hold the data of NET in memory.Storage: Read data from, and writes data to the hard disk.
Appendix: Requirements
Product scope
Target user profile
- Has a need to track various things
- Is able to use Graphical User Interface (GUI)
- Can type fast
- Prefers typing to interaction with a graphical user interface (GUI)
- Is comfortable using GUI apps
Value proposition:
To track all expenses faster than a typical Excel spreadsheet.
User Stories
Priorities: High (must have) - * * *, Medium (nice to have) - * *, Low (unlikely to have) - *
| Priority | Version | As a … | I want to … | So that I can … |
|---|---|---|---|---|
* * * |
v1.0 | Student | add an item to list | track various events/items daily |
* * * |
v1.0 | Student | add an item to list with deadline | keep track deadline |
* * * |
v1.0 | Student | mark an item as completed | track on various thing that I’ve done |
* * * |
v1.0 | Student | list and view all the items I added | be aware of what I have added |
* * * |
v1.0 | Student | delete an item I added | remove the wrongly added items |
* * * |
v1.0 | Student | search for an item with keyword in the system | filter out the event/items that I want to see |
* * * |
v1.0 | Student | see the total expense incurred in the system | be aware of my spending |
* * * |
v1.0 | Student | save all items I’ve added to a readable text file and load from it | I can keep track of the history. |
Use Cases
(For all use cases below, the System is the Duke and the Actor is the Student)
Use Case Diagram
[To be updated]
Non Functional Requirements
- Should work on any mainstream OS as long it has Java
11or above installed. - User will be able to interact with the systems with regular english text. For example: (
todo Homework). - User will be able to interact with their Duke.txt if they wish to make amendment.
Glossary
- MainStream OS - Windows, Linux, Unix, OS-X
- Regex - Regular Expressions
- JDK - Java Development Kit - Java SE
- Gradle - Gradle Build Tool - Gradle User Manual
- Intellij / IDE - Intellij Integrated Development Environment - IntelliJ IDEA
- Plugin - IDE Plugins - Intellij IDEA Plugins